My Avatars


Grab my Blinkie

I CT for


Blog Trains


Forums I Visit


Blogs I Love


Networked Blogs

Showing posts with label Scraps With Attitude. Show all posts
Showing posts with label Scraps With Attitude. Show all posts
Tuesday, July 26, 2011
Fish in the Sea

This tutorial was written by me
Any tutorial similar is highly coincidental
This tutorial was written for those who have basic knowledge of psp
This tutorial was written in pspx2 but can work in other versions
Tutorial written July 26th, 2011
Supplies Needed
Tube of choice (with closeup)
Scrap kit - Any Fish in There by Heaven Designs which you can buy HERE
This tutorial was written for those who have basic knowledge of psp
This tutorial was written in pspx2 but can work in other versions
Tutorial written July 26th, 2011
Supplies Needed
Tube of choice (with closeup)
Scrap kit - Any Fish in There by Heaven Designs which you can buy HERE
Scrap Kit Supplies
HD_any_fish_in_there_ele_tags_33
HD_any_fish_in_there_ele_tags_78
HD_any_fish_in_there_ele_tags_80
HD_any_fish_in_there_ele_tags_89
HD_any_fish_in_there_ele_tags_90
HD_any_fish_in_there_paper_tags_18
Lets Get Started
Open a new 500 x 500 image - resize element 78 to 450 x 448 and paste on your tag - paste paper 18 on your tag and move below the frame - with your magic wand go back to the frame layer and hit the center of the frame - selections / modify / expand by 5 / selections / invert - go back to the paper layer and hit delete on your keyboard - paste the close up tube on your tag - with your magic wand go back to the frame layer and hit the center of the frame - selections / modify / expand by 5 / selections / invert - go back to the tube layer and hit delete on your keyboard - change the blend of the tube to overlay
Paste the regular sized tube on your tag - resize element 89 to 500 x 327 and paste on your tag - change the blend to screen - resize element 90 to 500 x 322 and paste on your tag - change the blend to screen - resize element 33 to 300 x 187 and paste on your tag - move to the top right of your tag - resize element 80 to 200 x 171 and paste on your tag - move it slightly down and to the right(not by much though) - go back through and add a drop shadow to the dolphin, turtle, frame, tube, and frame
Add your name and copyright - and your done
Friday, July 22, 2011
Chains and Whips

This tutorial was written by me
Any tutorial similar is highly coincidental
This tutorial was written for those who have basic knowledge of psp
This tutorial was written in pspx2 but can work in other versions
Tutorial written July 22th, 2011
Supplies Needed
Tube of choice(with a close-up)
Scrap kit - S&M by Tammys Scraps which which you can buy HERE
This tutorial was written for those who have basic knowledge of psp
This tutorial was written in pspx2 but can work in other versions
Tutorial written July 22th, 2011
Supplies Needed
Tube of choice(with a close-up)
Scrap kit - S&M by Tammys Scraps which which you can buy HERE
Scrap Kit Supplies
S&M Element 21
S&M Element 26
S&M Element 55
S&M Element 64
S&M Element 71
S&M Element 84
S&M Element 96
S&M Paper 5
S&M Paper 17
Lets Get Started
Open a new 500 x 500 transparent image - resize element 96 to 500 x 500 and paste on your tag - paste both paper 5 and paper 17 on your tag 0 move them both below the frame with paper 5 on top of paper 17 - with your magic wand and the frame layer selected hit the center of the frame - selections / modify / expand by 2 / selections / invert - go to each paper layer and hit delete on your keyboard - change the blend of paper 5 to overlay - paste the close up tube and move below the frame - selections / modify / expand by 2 / selections / invert - go back to the tube layer and hit delete on your keyboard - change the blend of the tube layer to hard light - paste element 21 on your tag and move below the close up tube layer
Resize element 55 to 246 x 250 and paste on your tag - move it to the bottom left of your tag and add a slight curve to it and a drop shadow - resize element 26 to 475 x 347 and paste on your tag - add a drop shadow to element 26 - resize element 84 to 200 x 93 - paste on your tag and move to the top right of your tag - add a drop shadow to element 84 - Paste the regular sized tube on your tag and leave it centered - resize element 64 to 280 x 179 and paste on your tag - move to the bottom right side of your tag - add a drop shadow - resize element 71 to 200 x 500 - change your foreground to element 71 and flood fill it on your tag
Add your name and copyright - and your done
Wednesday, July 13, 2011
Spider Girl

This tutorial was written by me
Any tutorial similar is highly coincidental
This tutorial was written for those who have basic knowledge of psp
This tutorial was written in pspx2 but can work in other versions
Tutorial written July 13th, 2011
Supplies Needed
Tube of choice(with closeup)
Scrap kit - Spider_Girl by Toxic Desirez which you can buy HERE
This tutorial was written for those who have basic knowledge of psp
This tutorial was written in pspx2 but can work in other versions
Tutorial written July 13th, 2011
Supplies Needed
Tube of choice(with closeup)
Scrap kit - Spider_Girl by Toxic Desirez which you can buy HERE
Font of choice - im using Spider bite which you can get HERE
Scrap Kit Supplies
Kristin - Spider Girl - frame 1
Kristin - Spider Girl - City Scene
Kristin - Spider Girl - Paper 21
Kristin - Spider Girl - Paper 19
Kristin - Spider Girl - Splatter
Kristin - Spider Girl - Sparkles
Kristin - Spider Girl - Wordart
Lets Get Started
Open a new 500 x 500 image - resize frame 1 to 490 x 483 and paste on your tag - paste paper 21 on your tag and move below the frame - go to the frame layer and with your magic wand hit the center of the frame - selections / modify / expand by 5 / selections / invert - go back to the paper layer and hit delete on your keyboard - paste paper 19 on your tag and move below the frame but above the other paper - follow the same step as you did to get rid of the extra paper outside of the frame from paper 21
Paste the close up tube on your tag and arrange below the frame so that it fits the whole space - if theres multiple tube layers merge them together - go to the frame layer and with your magic wand hit the center of the frame - selections / modify / expand by 5 / selections / invert - go back to the tube layer and hit delete on your keyboard
Resize splatter to 383 x 500 and paste on your tag above the frame - resize wordart to 475 x 407 and paste on your tag - resize skyline to 400 x 127 and paste on your tag and move to the bottom of the frame - paste the tube on your tag - duplicate it and move one below the skyline - with your eraser erase the left shoe of the tube above the skyline so that it looks like its below the skyline - resize sparkles to 203 x 500 - free rotate by 90 to the right - change your forground to the sparkles and flood fill that on a new layer - go back through and add a drop shadow to the bottom tube, frame, and skyline
add your name and copyright - and your done
Friday, June 24, 2011
Angeliki

This tutorial was written by me
Any tutorial similar is highly coincidental
This tutorial was written for those who have a basic knowledge of psp
This tuttorial was written psp x2
Supplies Needed
Tube of choice
Scrap kit - Angeliki by which you Kristin/toxic Desirez which you can get HERE
Word Art by me(optional) which you can get HERE
Scrap Kit Supplies
Kristin - Angeliki - Cloud 2
Kristin - Angeliki - Halo
Kristin - Angeliki - Light Rays
Kristin - Angeliki - Wordart(optional or mine)
Kristin - Angeliki - Paper 21
Kristin - Angeliki - Paper 17
Lets Get Started
Part 1
Open a new 600 x 250 transparent image
Paste paper 21 on your tag
Paste paper 17 on your tag and change the opacity to 50 or close to 50
Paste the light rays on to your tag
Add a new raster - selections - select all - modify - select selection borders - settings at inside and border width set to 6
Flood fill with a gradient of a light and dark color from the papers
Add a new raster - selections - select all - modify - select selection borders - settings at inside and border width set to 8
Flood fill with black
Part 2
Open a new 700 x 350 transparent image
Copy merged your tag from part 1 and paste on your new image and rename it angelikip1
Paste cloud 2 on your tag and leave it centered
Paste the Halo and move it to the top left side - rotate it just a little - Duplicate it and move one under Angelikip1
Select the Halo above Angelikip1 - with your eraser zoom in on the halo and erase the part of the halo above the edge of the frame
Paste your tube above the cloud
Add The wordart(mine or the one from the kit) resize if necessary and move to the top right corner
Add your name and copyright
Save as a png and voila your done
Thanks for trying my tut
Wednesday, June 22, 2011
Clatter

This tutorial was written by me
Any tutorial similar is highly coincidental
This tutorial was written for those who have a basic knowledge of psp
This tuttorial was written psp x2
Supplies Needed
Tube of choice
Scrap kit - In a Childs Eyes by Scraps with Attitude(Missy) which you can buy HERE
Word Art by me which you can get HERE
Scrap Kit supplies
SWA_IACE_E17
SWA_IACE_E35
SWA_IACE_E43
SWA_IACE_P10
Lets Get Started
Open a new 600 x 250 image
paste SWA_IACE_P10 on your tag
Paste your tube on your tag and arrange like mine below
[Image]paste SWA_IACE_E43 on your tag
resize SWA_IACE_E17 to 223 x 235 paste on your tag - images - free rotate - direction should be right, degrees set to free and to 30.00 all layers unchecked - and add a slight drop shadow
resize SWA_IACE_E35 to 342 x 279 paste on your tag and move it down slightly
paste your tube(resize if necessary) on your tag and move to the left side and add a slight drop shadow
Open up my word art and resize to 290 x 135 paste on your tag move to the top right side and add a slight rotation
Add a new raster - selections - select all - modify - select selection borders with it set to inside and border at 3
Flood fill with a dark color from your tag and add some noise to it
Redo that step but instead of the border at 3 set it to 4 and flood fill with white
Add your name and copyright and congrats!!! your finished
Thanks for trying my tut and thanks for the great kit missy
Snowlicious

This tutorial was written by me
Any tutorial similar is highly coincidental
This tutorial was written for those who have a basic knowledge of psp
This tuttorial was written psp x2
Supplies Needed
Tube of choice
Scrap kit - Snowlicious by Kristin which you can buy HERE
Word Art by me which you can get HERE
ScrapKit supplies
Kristin - Snowlicious - Snow
Kristin - Snowlicious - Snow Cone 2
Kristin - Snowlicious - Snowy Tree 1
Kristin - Snowlicious - Wreath
Kristin - Snowlicious - Paper 15
Lets Get Started
Open a new 550 x 500 image
Resize Kristin - Snowlicious - Wreath to 89% and paste on the new image
Add a slight dropshadow to your wreath - then repeat the step but with the negatives of the numbers you chose
Copy and paste Kristin - Snowlicious - Paper 15 on your tag and move it below the wreath
Chose your Magic wand tool and with your wreath layer selected click the middle
Selections - select all - modify - expand by atleast 10 - invert - with the paper layer selected click delete on keyboard
Copy and paste Kristin - Snowlicious - Snow and move under the wreath and over the paper
Chose the magic wand tool and with the paper layer selected click the middle
Selections - invert - and with the snow selected hit delete on your keyboard
Paste Kristin - Snowlicious - Snow on your tag and move it above the wreath
Chose the magic wand and look at the toolbar - and make sure the tolerance is at 180
with the wreath layer selected click on it
Selections - invert - with the snow selected hit delete on your keyboard
Resize Kristin - Snowlicious - Snowy Tree 1 to 76% and paste on tag and move to the left side
Add a slight dropshadow to your tree
Resize Kristin - Snowlicious - Snow Cone 2 to 47% and past on your tag and move to the top right with a slight curve
Add a slight drop shadow to the snow cone
Paste your tube on your tag(you may need to resize first)
Add a slight drop shadow to the tube
Paste my wordart on the tag and move to the bottom of your tag
Add your name and correct copyright
Congratulations you have finished
Thanks for trying my tut
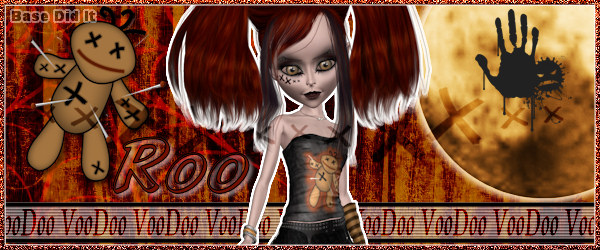
VooDoo
This tutorial was written by me
Any tutorial similar is highly coincidental
This tutorial was written for those who have a basic knowledge of psp
This tuttorial was written psp x2
Supplies Needed
Scrap kit - Nightmare 2 by Kristin which you can buy HERE
Scrap Kit Supplies
VooDooChildTS_SBR07
VooDooChildTS_SBR10
VooDooChildTS_SBR14
VooDooChildTS_SBR16
VooDooChildTS_SBR23
VooDooChildTS_SBR31
VooDooChildTS_SBR43
VooDooChildTS_SBR50
Lets Get Started
Open a new 600 x 250 transparent image
Copy and paste VooDooChildTS_SBR16 on your tag
Copy and paste VooDooChildTS_SBR14 on your tag and change the blend mode to soft light
Copy and paste VooDooChildTS_SBR43 and move to the top left and change the blend mode to screen
Resize VooDooChildTS_SBR23 to 300 x 301 and paste and move to the top of right
Duplicate VooDooChildTS_SBR23 and change the blend mode to hard light
With the rectangle preset shape tool draw a small white rectangle on the bottom of your tag
Effects - texture - blinds and use my settings

Change the opacity on the rectangle to somewhere around 56
With the rectangle selected - selections - select all - modify - select selection borders and use my settings

With a spooky font type VooDoo on the white rectangle and keep typing VooDoo until it fills the page
Convert the text to raster and change the blend mode to Burn
Resize VooDooChildTS_SBR50 to 262 x 518 and paste on your tag
move so the face is showing - selections - select all - float - defloat - modify - expand by 2 - add new raster and flood fill with white 5 times on same layer
Resize VooDooChildTS_SBR10 to 156 x 200 and paste on your tag and move to the top left side of your tag copy and paste VooDooChildTS_SBR31 on your tag and change the blend mode to soft light
Resize VooDooChildTS_SBR07 to 115 x 150 and paste on your tag and move to the top right over the moon
Add new raster - selections - select all - modify - select selection borders and use the same settings as before
Flood fill with a gradient of a dark and light color from your tag
add noise and add an inner bevel
Add new raster - selections - select all - modify - select selection borders and instead of the border at 4 put it to 5 and flood fill with white
Add your name and copyright and your done
Thanks for trying this tut
Nightmare


This tutorial was written by me
Any tutorial similar is highly coincidental
This tutorial was written for those who have a basic knowledge of psp
This tuttorial was written psp x2
Supplies Needed
Scrap kit - Nightmare 2 by Kristin which you can buy HERE
Scrap Kit Supplies
Kristin - nightmare 2 - wordart
Kristin - nightmare 2 - jack
Kristin - nightmare 2 - wire
Kristin - nightmare 2 - glitter scatter
Kristin - nightmare 2 - tree2
Kristin - nightmare 2 - sparkles
Kristin - nightmare 2 - zero
Kristin - nightmare 2 - Paper 46
Kristin - nightmare 2 - Paper 6
Lets get started
Lets get started
Open a new 600 x 250 transparent image
Copy and paste Kristin - nightmare 2 - Paper 46 on your tag
Copy and paste Kristin - nightmare 2 - Paper 6 and change the blend mode to 6
Copy and paste Kristin - nightmare 2 - glitter scatter and change the blend mode to multiply(you can choose any blend you want but i like the multiply effect)
Copy and paste Kristin - nightmare 2 - wire on your tag
copy and paste Kristin - nightmare 2 - tree2 on your tag and move it to the left side
copy and paste Kristin - nightmare 2 - sparkles and change the blend mode to screen
copy and paste Kristin - nightmare 2 - zero and move it over the tree on your tag copy and paste Kristin - nightmare 2 - jack on your tag and move to the right
copy and paste Kristin - nightmare 2 - wordart and leave it centered in the middle
Add new raster - selections - select all - modify - select selection borders - and use my settings

In your layers palette select Kristin - nightmare 2 - Paper 6 - effects - reflection - kaleidoscope and use my settings

keep Kristin - nightmare 2 - Paper 6 selected in layers and the inside selection borders
Right click and cut
Right click in psp somewhere and paste as new image(we will be using this in a second)
Go back to your tag and add a new raster - selections - select all - modify - select selection borders and instead of 6 put the border to 8 and flood fill with white
Go back to the paper 6 border and Adjust - add/remove noise - add noise and use my settings

Effects - 3d effects - inner bevel and use these settings
bevel #2 - Width 12 - smoothness 0 - depth 5 - ambiance 10 - shininess 5 - angle 315 - intensity 40 - elevation 50 - color white
Copy and paste the border on your tag
Add your name and copyright - save as a jpeg and your done
Now lets start your Avatar
Open a new 150 x 150 transparent image
Copy and paste Kristin - nightmare 2 - Paper 46 on your tag
Copy and paste Kristin - nightmare 2 - Paper 6 and change the blend mode to 6
Copy and paste Kristin - nightmare 2 - glitter scatter and change the blend mode to multiply(or you choice from before)
Copy and paste Kristin - nightmare 2 - wire on your tag
copy and paste Kristin - nightmare 2 - zero and move to the left so that face is showing
Copy and paste Kristin - nightmare 2 - jack and move to the right and have the face showing
Add new raster - selections - select all - modify - select selection borders - and use same settings but instead of 6 put the border to 4
In your layers palette select Kristin - nightmare 2 - Paper 6 - effects - reflection - kaleidoscope and use the same settings as before
keep Kristin - nightmare 2 - Paper 6 selected in layers and the inside selection borders
Right click and cut
Right click in psp somewhere and paste as new image(we will be using this in a second)
Go back to your tag and add a new raster - selections - select all - modify - select selection borders and instead of 4 put the border to 5 and flood fill with white
Go back to the paper 6 border and Adjust - add/remove noise - add noise and use my settings
Effects - 3d effects - inner bevel and use these settings
bevel #2 - Width 12 - smoothness 0 - depth 5 - ambiance 10 - shininess 5 - angle 315 - intensity 40 - elevation 50 - color white
Copy and paste the border on your tag
Add your name and copyright - save as a jpeg and your done
Subscribe to:
Posts (Atom)
Popular Posts
-
 This tutorial was written by me Any tutorial similar is highly coincidental This tutorial was written for those who have basic kno...
-
 Click the preview for Download Stina ::designs by stina:: Tootypup: Tootypup Scraps Anita: Daydreamers Crys: Sinfully Creative...
-
 This tutorial was written by me Any tutorial similar is highly coincidental This tutorial was written for those who have basic knowl...
-
 This tutorial was written by me Any tutorial similar is highly coincidental This tutorial was written for those who have basic know...
-
 Click the preview for the download Alpha has 4 different colors for each letter HEADQUARTERS
-
 This tutorial was written by me Any tutorial similar is highly coincidental This tutorial was written for those who have basic ...
-
 This tutorial was written by me Any tutorial similar is highly coincidental This tutorial was written for those who have basic knowl...
-
 This tutorial was written by me Any tutorial similar is highly coincidental This tutorial was written for those who have basic knowledge...
-
 This tutorial was written by me Any tutorial similar is highly coincidental This tutorial was written for those who have basic knowl...


