


Tuesday, June 12, 2012
Under the Sea
This tutorial was written by me
Any tutorial similar is highly coincidental
This tutorial was written for those who have basic knowledge of psp
This tutorial was written in pspx2 but can work in other versions
Tutorial written June 12, 2012
Supplies Needed
This tutorial was written for those who have basic knowledge of psp
This tutorial was written in pspx2 but can work in other versions
Tutorial written June 12, 2012
Supplies Needed
tube of choice
Scrap Kit Supplies
uts_ee6
uts_ee7
uts_ee15
uts_ee30
uts_ee34
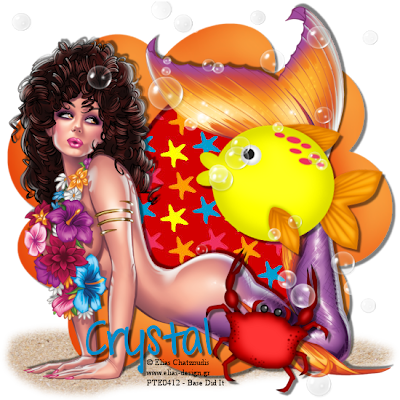
Lets Get Started
Open a new 550 x 550 transparent image - resize uts_ee30 to 530 x 485 and paste on your tag - paste uts_pp4 on your tag and move it below the frame - with your magic wand and the frame layer selected click the center of the frame - selections / modify / expand by 4 - click on the paper layer in the your layers - selections / invert / hit delete on your keyboard - add a drop shadow to your frame - resize uts_ee34 to 550 x 111 and paste on your tag - move it below the frame layer - move it to the bottom of the tag - Paste the tube on your tag - add a drop shadow to your tube
Resize uts_ee6 to 250 x 179 and paste on your tag - move it to the right of your tag and add a drop shadow - resize uts_ee7 to 169 x 200 and paste on your tag - move it to the bottom right side of your tag and add a drop shadow - resize uts_ee15 to 518 x 545 and paste on your tag
Add your name and copyright and your done
Another tag with this scrap kit
Another tag with this scrap kit


Subscribe to:
Post Comments (Atom)
-
 This tutorial was written by me Any tutorial similar is highly coincidental This tutorial was written for those who have basic kno...
 -
 This tutorial was written by me Any tutorial similar is highly coincidental This tutorial was written for those who have basic knowl...
 -
 Click the preview for Download Stina ::designs by stina:: Tootypup: Tootypup Scraps Anita: Daydreamers Crys: Sinfully Creative...
 -
 This tutorial was written by me Any tutorial similar is highly coincidental This tutorial was written for those who have basic knowledge...
 -
 This tutorial was written by me Any tutorial similar is highly coincidental This tutorial was written for those who have basic know...
 -
 This tutorial was written by me Any tutorial similar is highly coincidental This tutorial was written for those who have basic ...
 -
 This tutorial was written by me Any tutorial similar is highly coincidental This tutorial was written for those who have basic knowl...
 -
 This tutorial was written by me Any tutorial similar is highly coincidental This tutorial was written for those who have basic knowl...
 -
 Click the preview for the download Alpha has 4 different colors for each letter HEADQUARTERS

0 comments:
Post a Comment